Introduction – Assignment Brief
For this assignment your task is to create an environment based on one of the four main themes listed below that also incorporates one of the sub-themes beneath them. The production of the environment needs to be recorded and logged in a development log on your WordPress site.
Programme Competencies Assessed:
- PC4 – PROJECT MANAGEMENT – Amend and implement a given plan to develop basic concepts to outcomes while managing time, resources, workload, deadlines and adapting to change.
- PC5 – SOFTWARE PROFICIENCY – Explore available tools, technologies and techniques in order to solve creative problems and demonstrate basic technical proficiency with specialism-specific software skills relevant to the task (with guidance).
- PC8 – REFLECTION – Reflect and evaluate on performance in order to inform personal development and continued learning of new skills
Main Themes:
- Horror
- Science Fiction
- Fantasy
- Historical
Sub-themes:
- Alien
- Corruption
- Utopia
- Dystopia
- Celebration
- Decay
- Family
- Beauty
Production piece expectations
These guidelines are what we expect to see as a minimum within your environmental submissions:
- A small to medium environment that demonstrates a building and its surrounding area. This could be a house and its garden. A church and a graveyard. A moon base and small excavation site. A spaceship and landing area. A sailing ship and jetty. The choice is up to you.
- The central asset you create in asset design must be placed in your environment in a way that assists the environmental storytelling of your environment. The asset itself will not be graded within Environment Design.
- You must fully furnish your environment with either created or found assets.
- The environment should be fully lit, and this should help enhance the mood of the finished piece.
- You are not being marked on the assets in your environment, but the layout, presentation and attention to detail in the finished piece.
- You are also being marked on the content of your blog posts for your portfolio, so it is imperative that you update these every week.
Chosen Themes and Ideas
Initially I was planning on going for a more Sci-Fi Horror type environment leaning into the more corrupted and decaying look and style as I am very familiar with that style through many of my favourite games. However, I decided to pick the themes of Fantasy and Beauty as a way to challenge myself with something I am almost completely unfamiliar with and pick something out of my comfort zone.
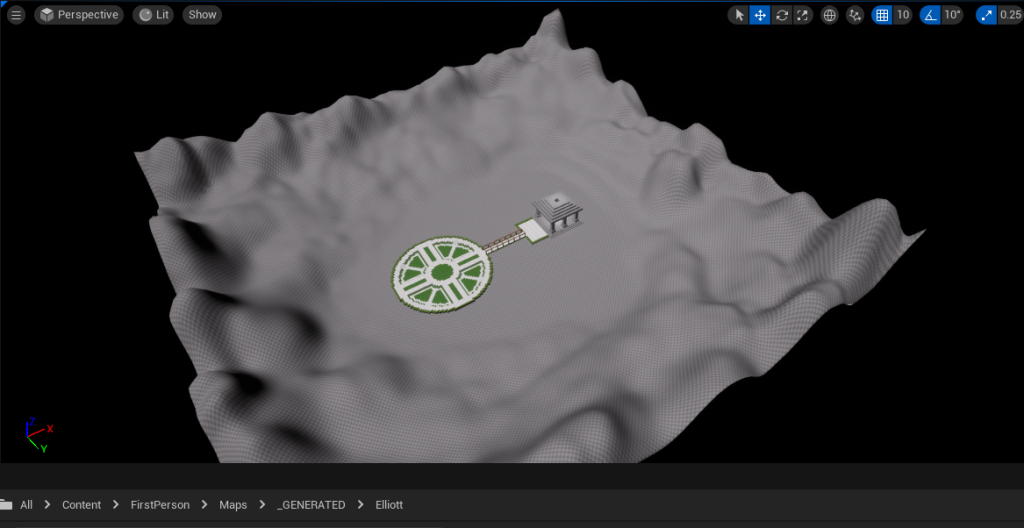
To align with the themes of Fantasy and Beauty, I decided that a secret moonlit garden hidden away in the woods would fit perfectly with my asset idea of a woodland spirit. To start I decided that I wanted to have a log cabin with a path out the back that led through the woods and opened up into a beautiful garden with my tree spirit floating in the middle.
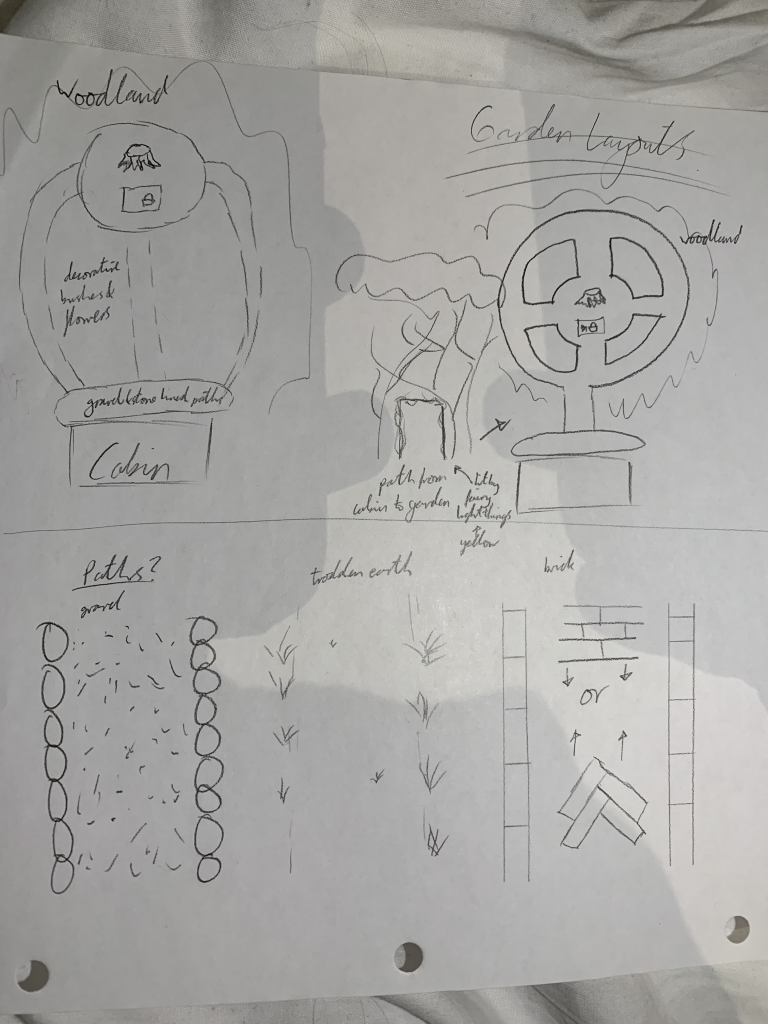
I then began to think more specifically, such as how I wanted the paths to be laid out, what materials I wanted the paths to be made out of, etc. I got my layout down to 2 main options, the one with multiple paths leading to a mini section at the end, and one that had a smaller path into a larger, circular garden.
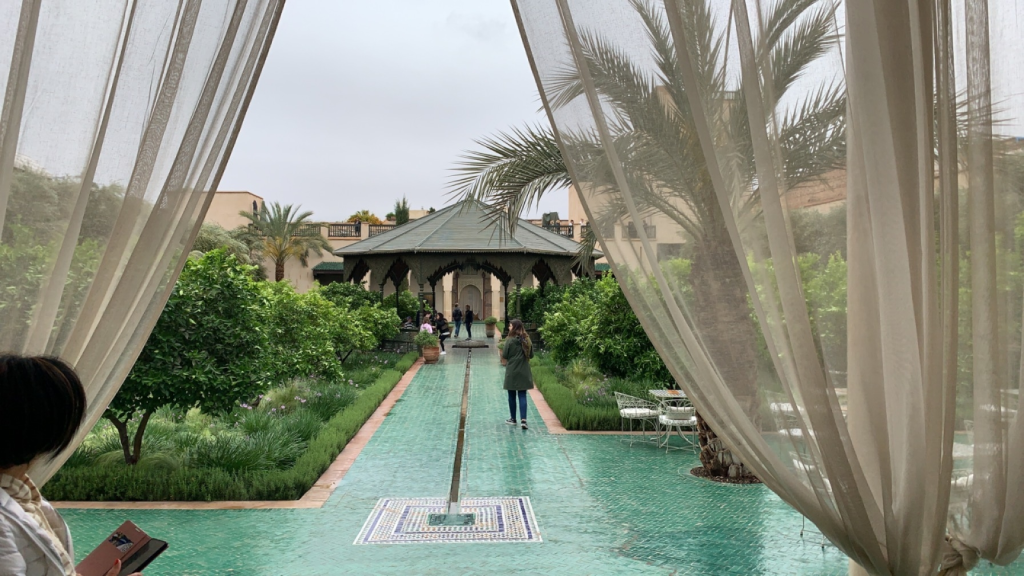
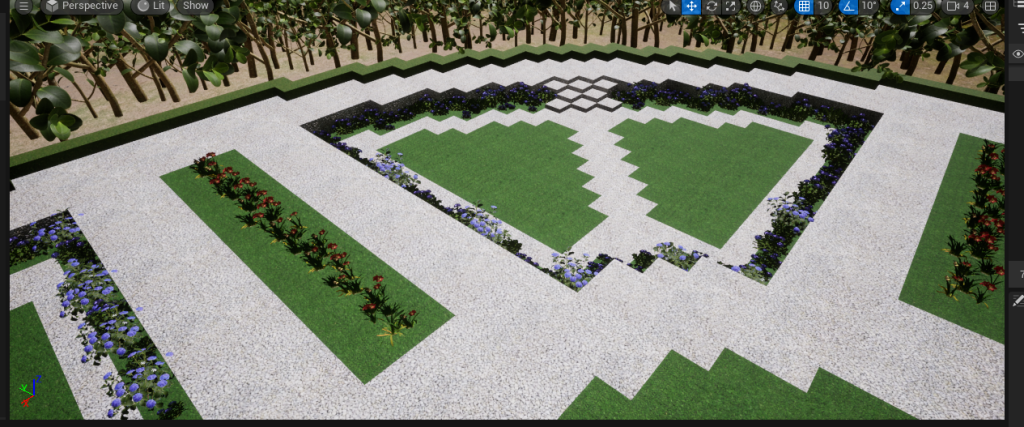
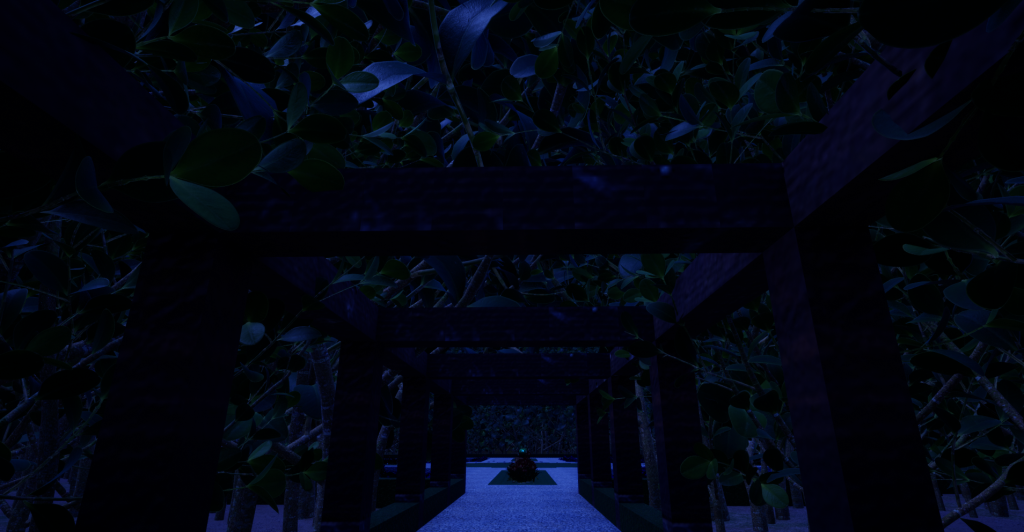
I decided to go with the latter as I felt the view of the restricted pergola tunnel opening up into this huge garden as the camera got closer to the end would be striking as opposed to it being very open from the beginning as would have been the case for the first option. This design was based loosely on a garden I visited when I went to Morocco with my family over Easter. It had the same, central circle with 4 paths branching off with garden between as my garden plan. However, I planned to have the garden quarter bits sink into the ground with flowers and paths to give it a nice clear view over the garden so that nothing got too high as to obstruct the view.
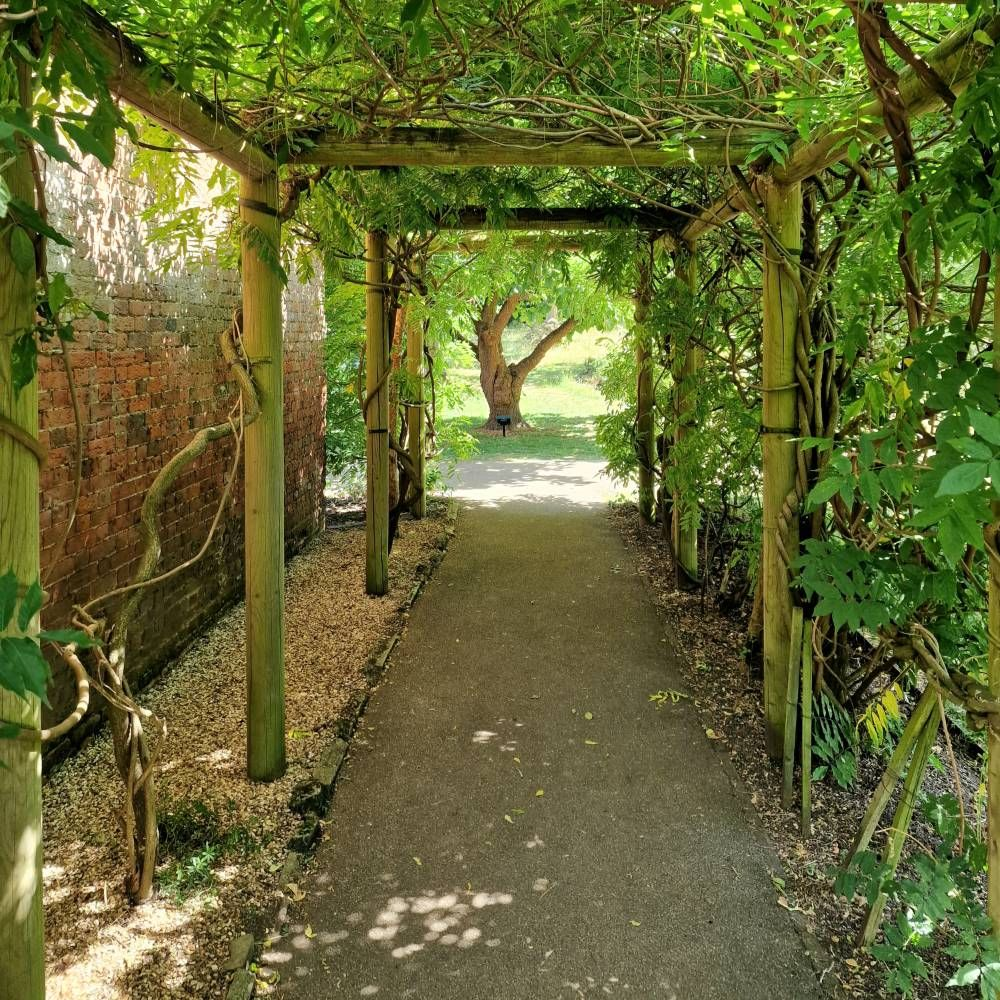
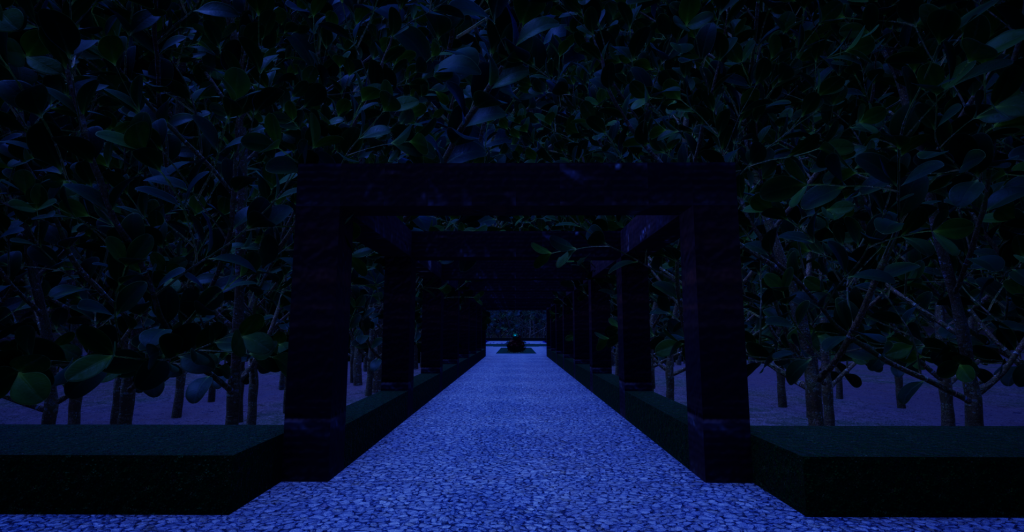
The next part was the pergola, which I have always liked the look of since I’ve been seeing them in nice parks and gardens for years and thought that one of these would serve perfectly to lead the camera through the woods towards the secret garden.
Next was the paths. For this I thought of many options, such as gravel, trodden earth, cobblestones, and different arrangements of bricks. However, I ended up deciding on white gravel edged by bushes as it gives a more natural feel than bricks whilst also being more organised and pretty than just well trodden dirt and the bushes gave a nice border to the whole garden.
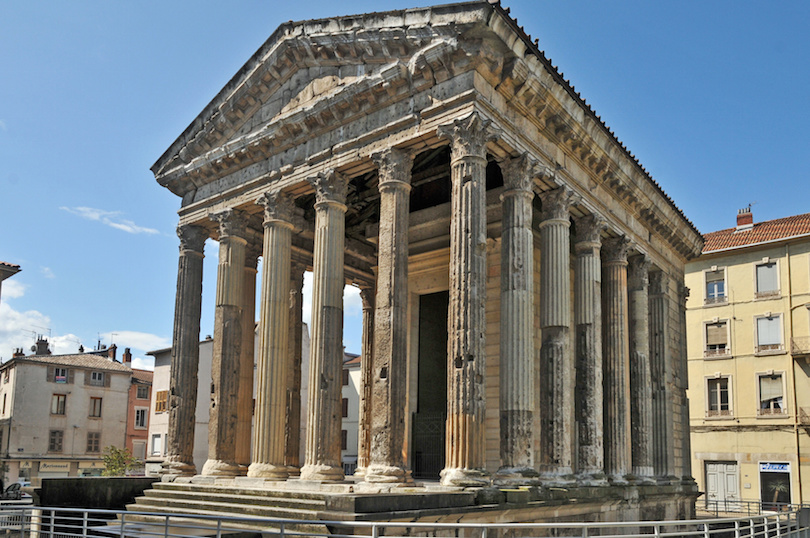
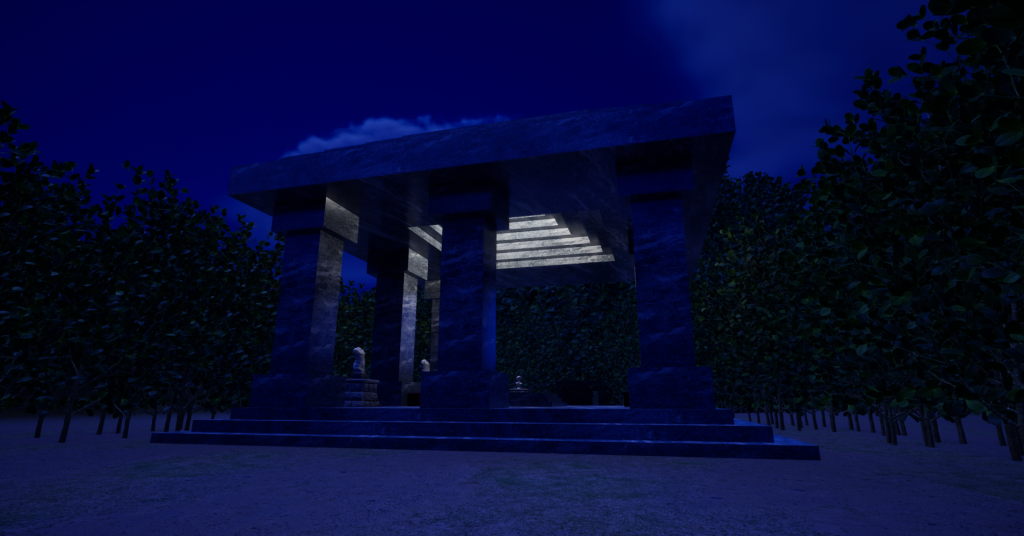
For the building I was torn between a Greek or Roman style temple as the architecture is very intricate and beautiful while its culture along with the Greeks has heavy connotations and links to fantasy and mythology. For this I planned to have a pretty standard pillar design but also include a skylight with a pool below similar to what many roman houses had in their atriums or main entrance halls.

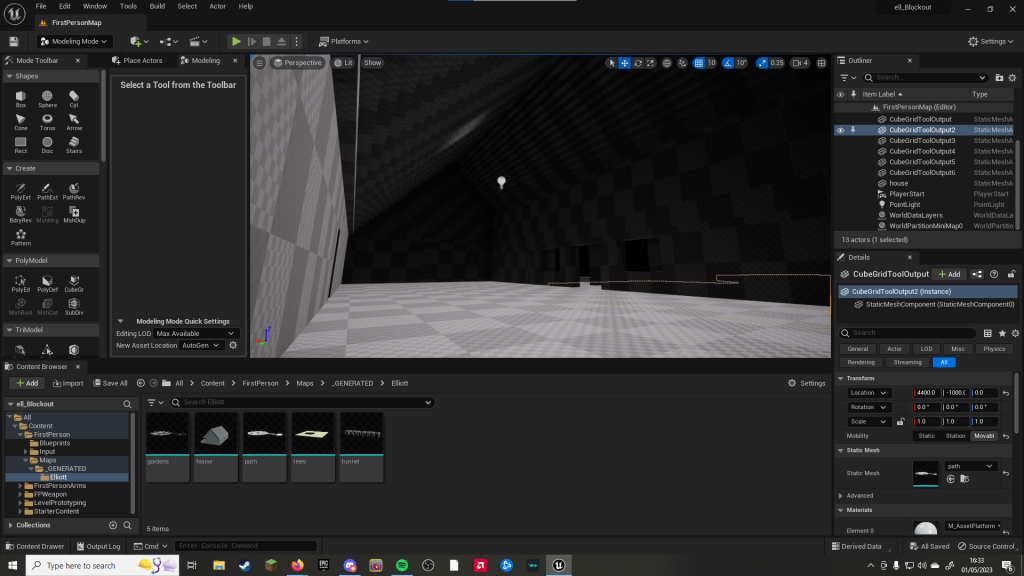
My other option was a pretty standard log cabin as it fits the woodland setting very well but can also be arranged and furnished very lavishly, allowing for a good exploration of the design and dive into the Beauty side of the theme with its interior.
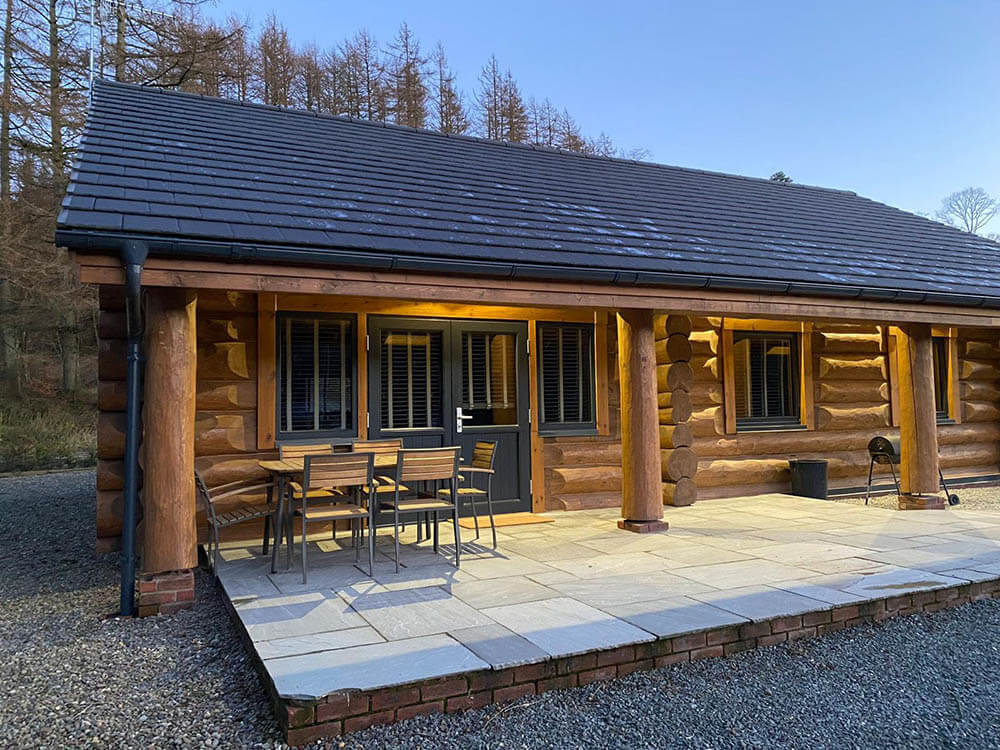
I ended up deciding to include the log cabin rather than the temple due to it fitting in with the location more than the temple, which could quite easily seem out of place in a forest.
As the environment itself was lacking in fantasy elements aside from the asset so I thought to add more subtly fantasy elements such as over sized trees and a much more blue night time as it would also complement the glow of the forest spirit asset in the middle.
Creation Process
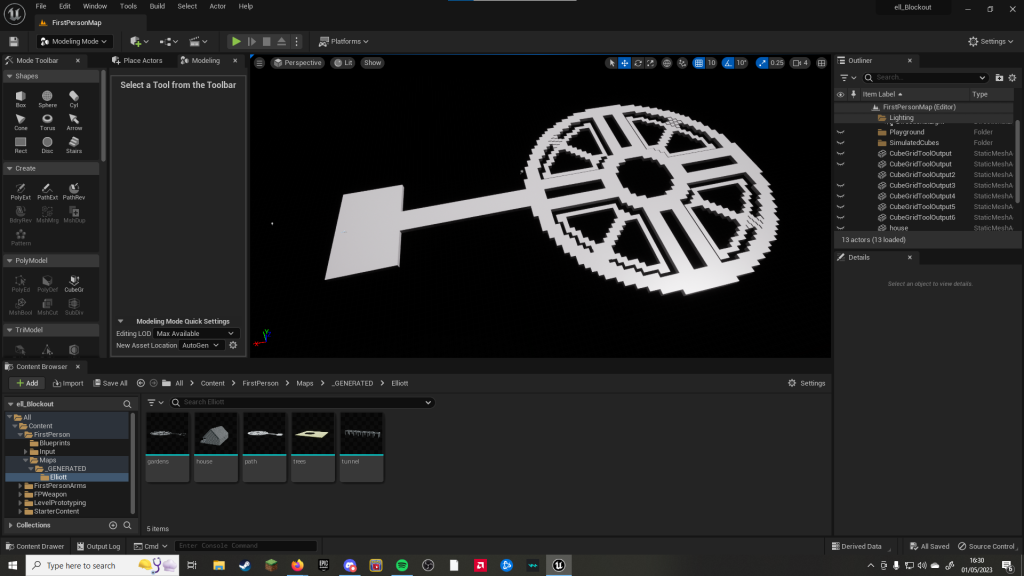
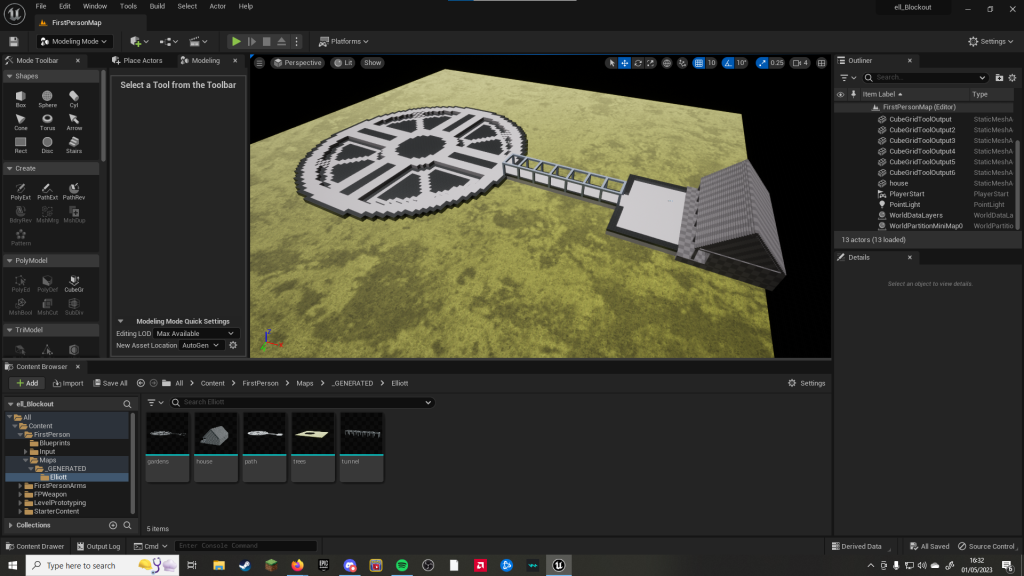
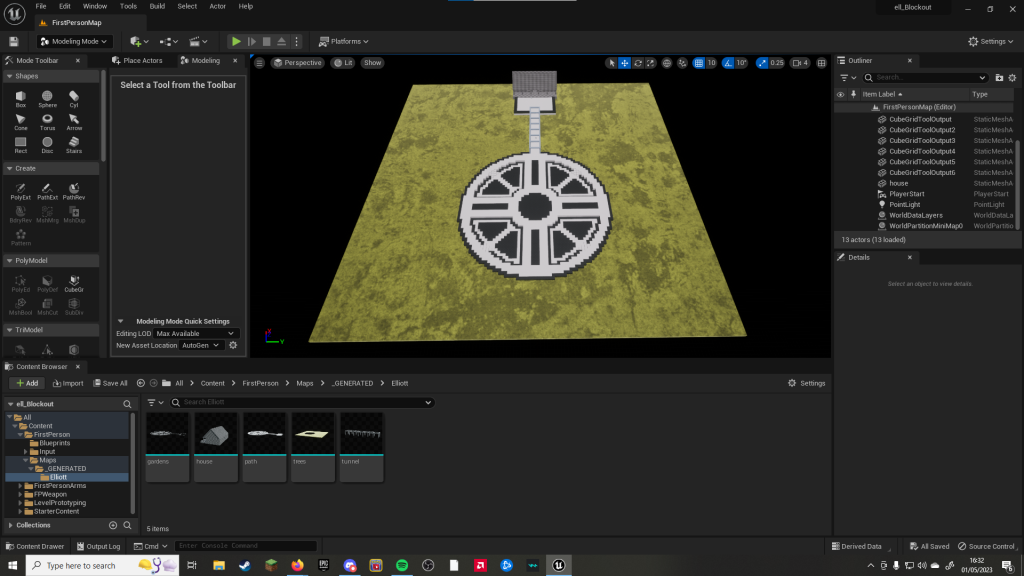
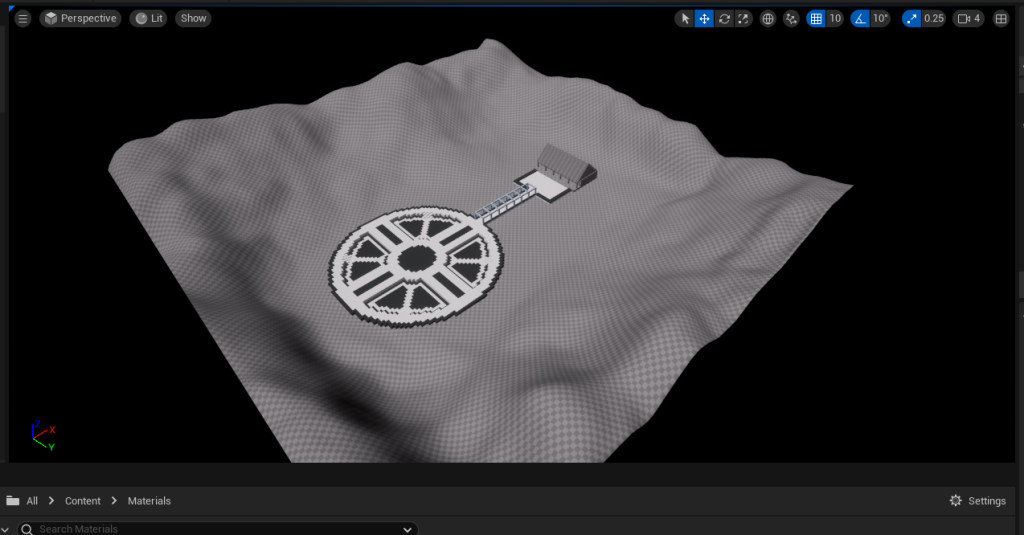
I started the creation process by plotting out the main pathway that follows from the cabin through the garden, using the Cube Grid tool to easily make sure everything was symmetrical and the right shape. I then added the inner, sunken paths in the quarters to give more depth to what was quite a flat design as well as lowering the Power to add more depth in the stairs rather than a sudden drop.
Next was the pergola, to bridge the path between the back of the cabin and the garden, which i then applied a random different material to so that it was properly differentiated with the other parts of the blockout.
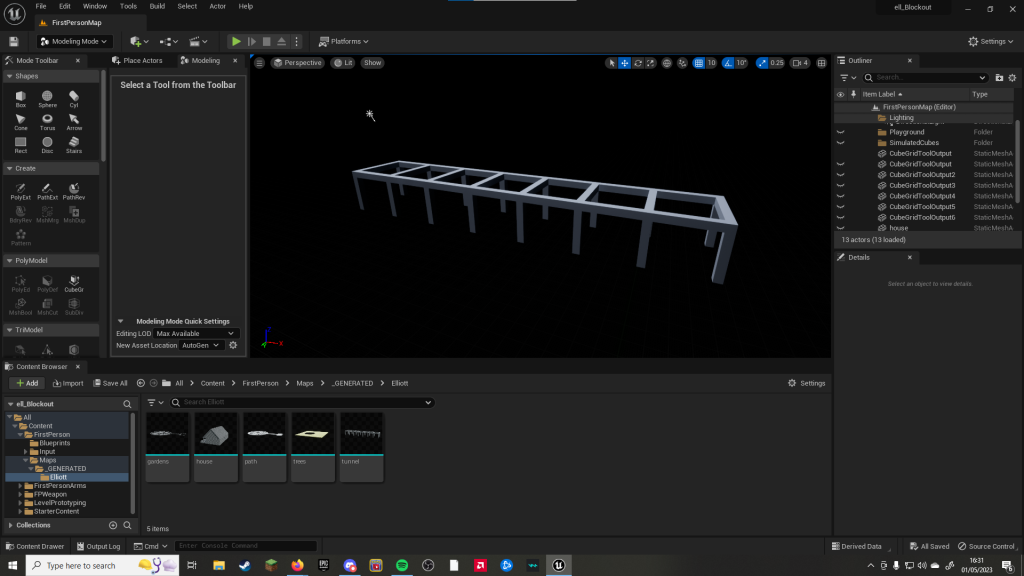
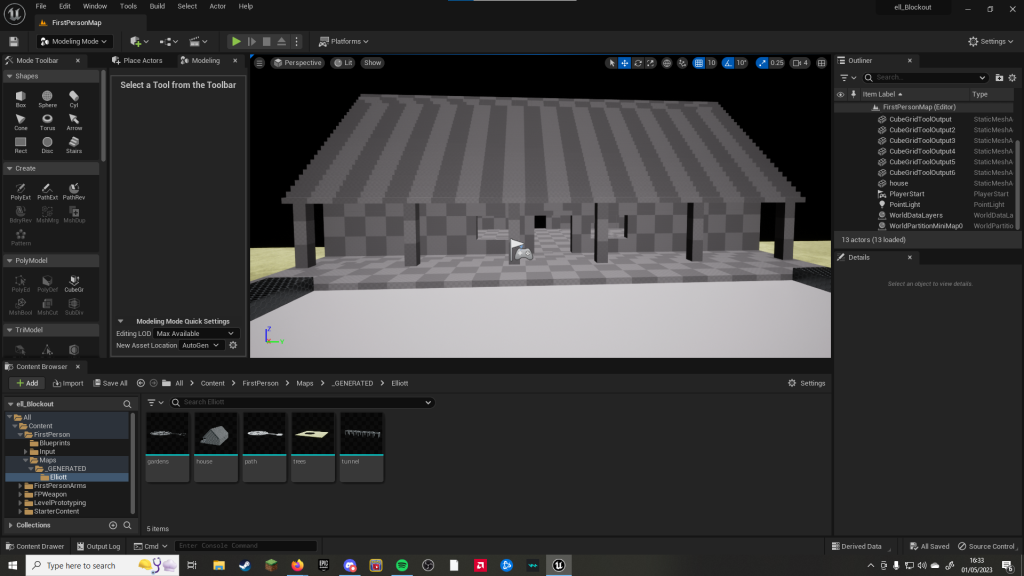
I then moved onto the cabin, opting to not include a second floor and instead have a larger flat wall that I would later be able to fully decorate and fill the ceiling space with wooden beams rather than an empty looking loft. I decided to include a veranda patio type thing that could include benches and flower pots later on down the line to give a more homely feel as well.
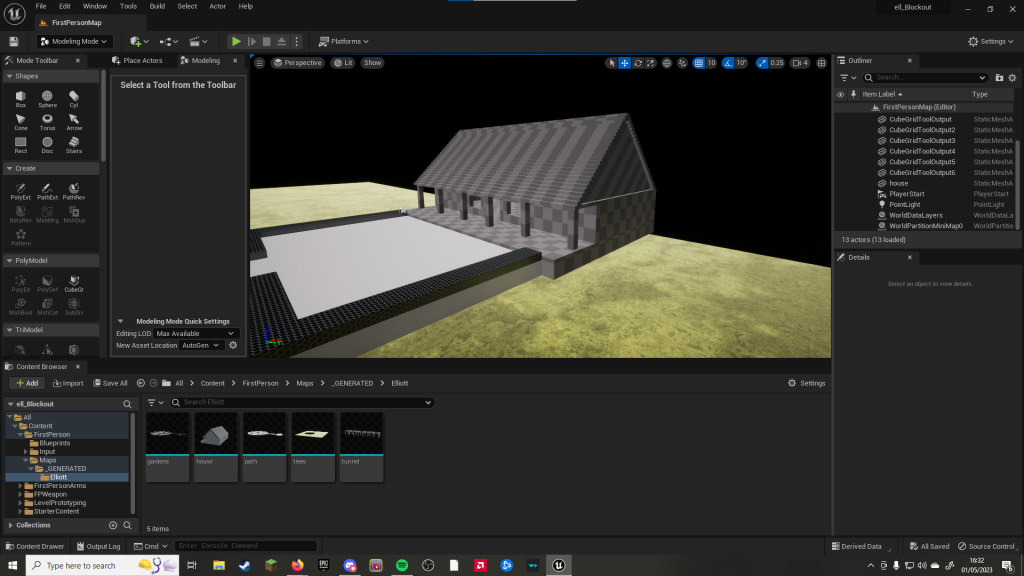
Next I added the garden bits, which was simply adding a border and filling in the gaps I left in the path at the different levels and then altering the material for easier differentiation again. I did however make a mistake here in not separating what would be grass and what would be bush as I would later on have to manually undo and redo all of this so that they could be textured differently. I also added a wide regular plane just to serve as the base plate before I sculpted a landscape.
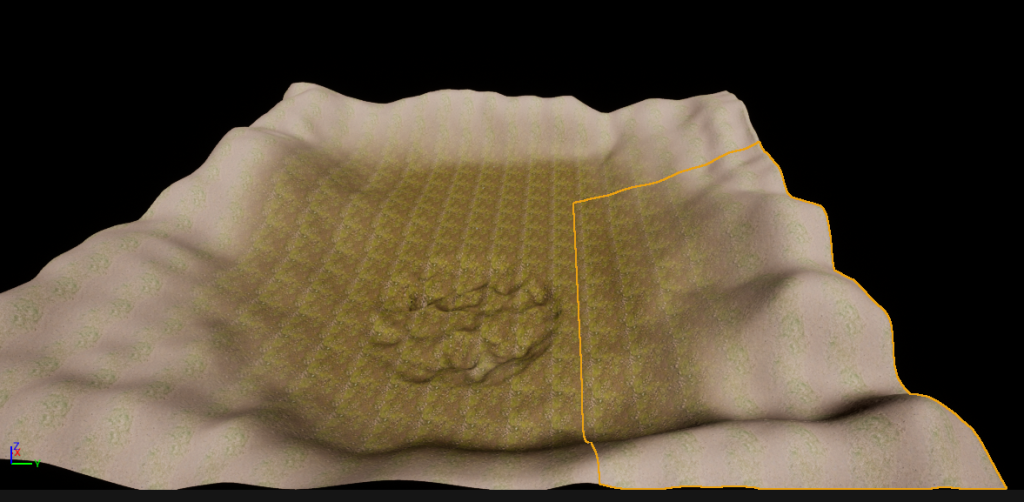
The next step on the list was to add a proper landscape instead of just a base plate. For this I added a 3×3 landscape plane and then used the sculpting tool to add hills around the edge to give the impression of being in a valley whilst also making the camera also not be staring into the void wherever they look. I then used the smoothing tool to remove some of the sharper edges and level out a lot of the rises up to the hills.
I then started work on texturing the landscape, opting for now for a top and bottom grass, starting out thicker with less surface dirt and getting more thin as the altitude rose to give more of a hilly mountain sort of feel to the environment. I then used the smoothing tool to make it so that the transition between these materials was gradual and not too stark.
I then added textures into the blockouts, choosing a white gravel for the path, a grainy wood for the pergola, and a richly green coloured grass for the main garden. However, this is where my mistake in lack of separation came in as I had to redo that layer so that it could have the more browny green coloured bush texture that I was aiming for the border to have.
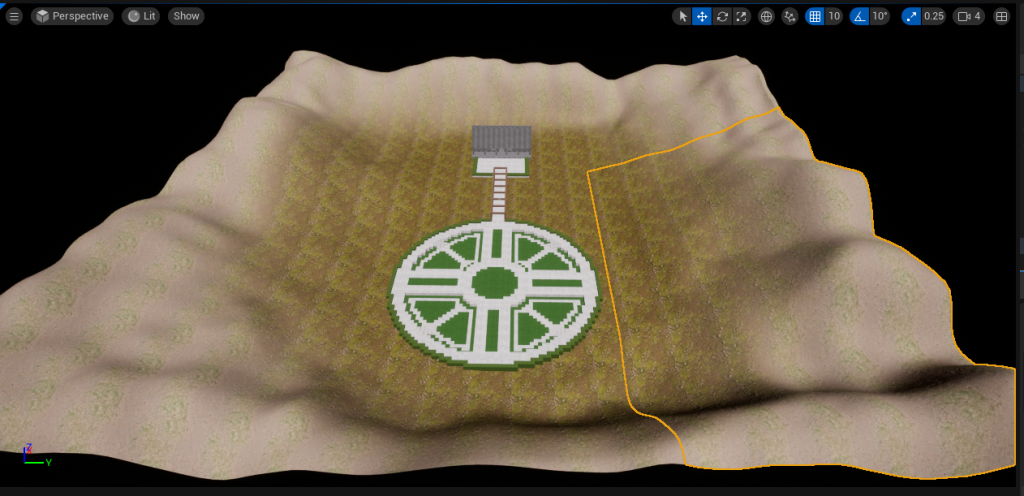
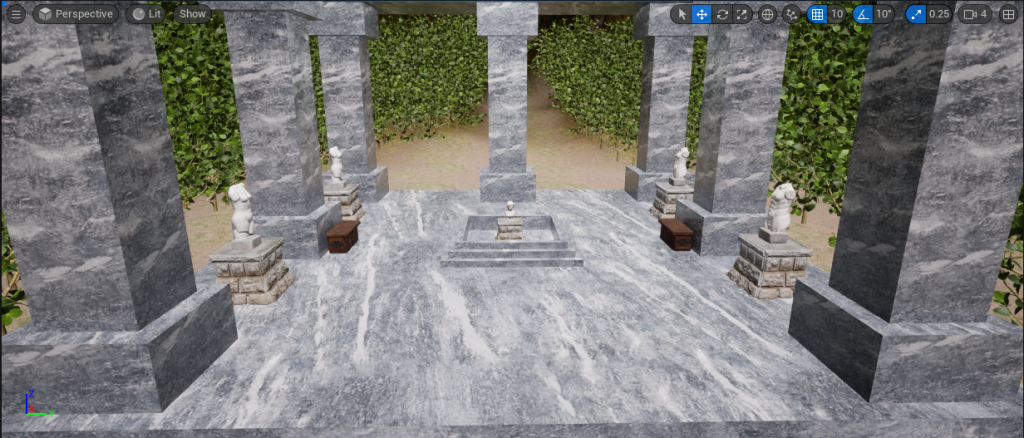
Next came a huge problem. The cabin was made as a single blockout, meaning that any texture I applied would be applied to the entire thing, making it look terrible. However, I didnt have enough time to go back and redo the model while separating each part that I thought would require a new texture. Instead I had to make the decision to change the building design, resorting to what would be a different, slightly easier temple that had come second to the original cabin idea.
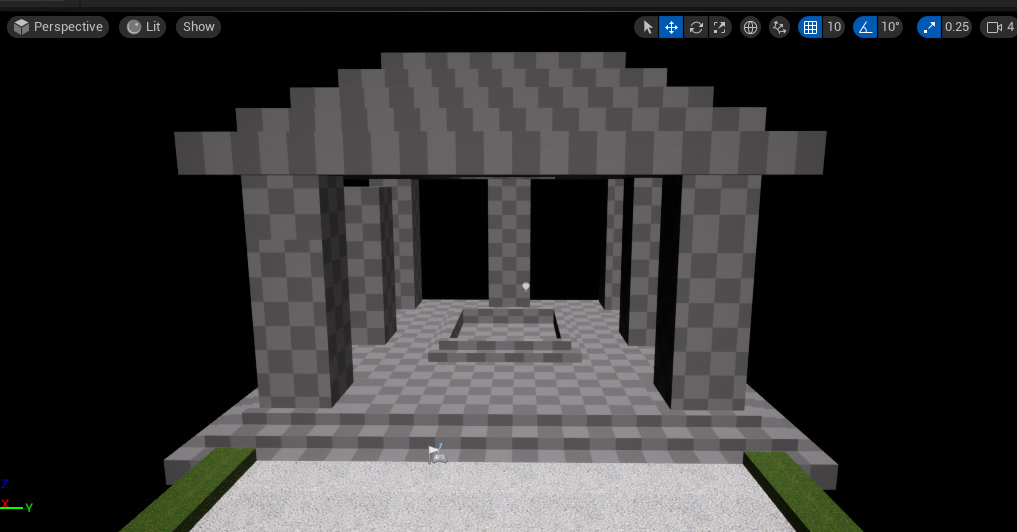
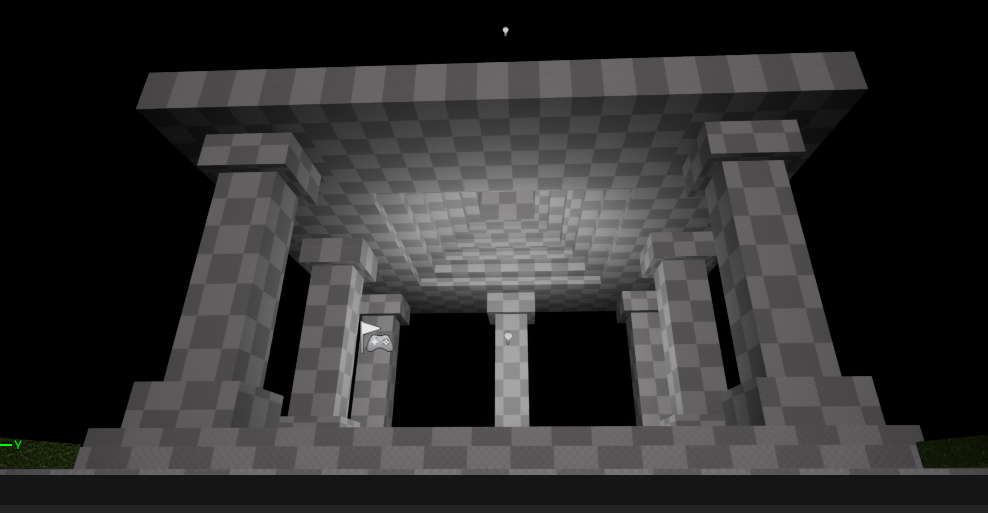
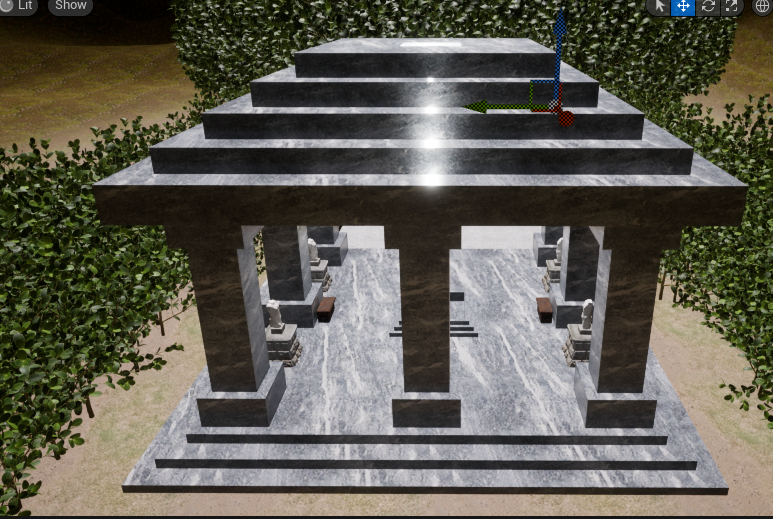
I began work on the temple, adding in the skylight pond, bevelling the columns and indenting the ceiling to add more detail and make the temple come together. The next decision was to redo the landscape as it was now slightly too small and the hills were clipping into the base of the temple. I then increased it from a 3×3 to a 5×5 grid, giving the environment plenty of room to breath on the landscape. I then decided to add a third grass texture as I wanted to flip the last texture and have the dirt start brighter as it was closer to the garden and gradually get darker as it moved further away up the hills.
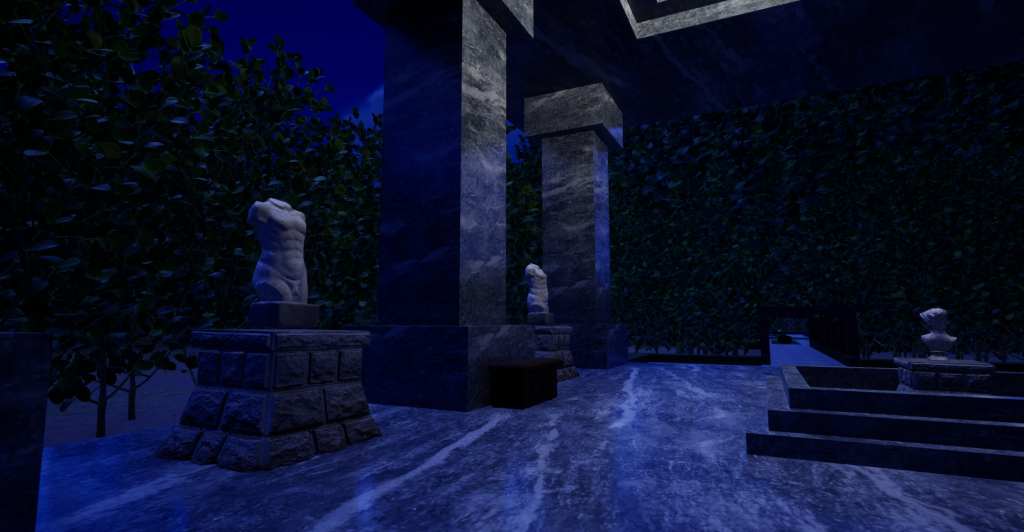
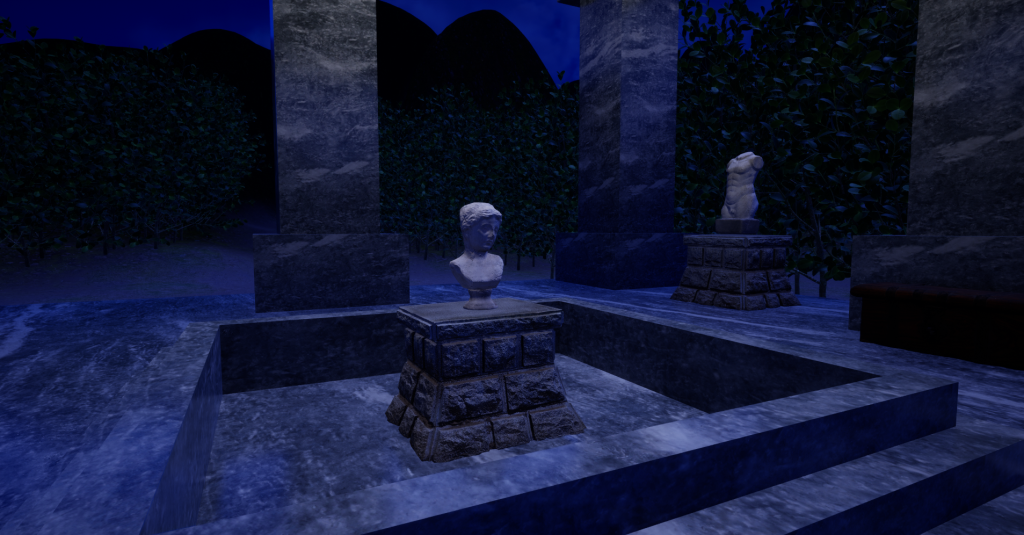
I then textured the temple, using its separate parts in order to keep the textures from being stretched and made to look unusual. Then I added the contents to the building, having it be a sort of display room, holding four body statues on the main floor and one bust in the atrium basin, with chests on either side.
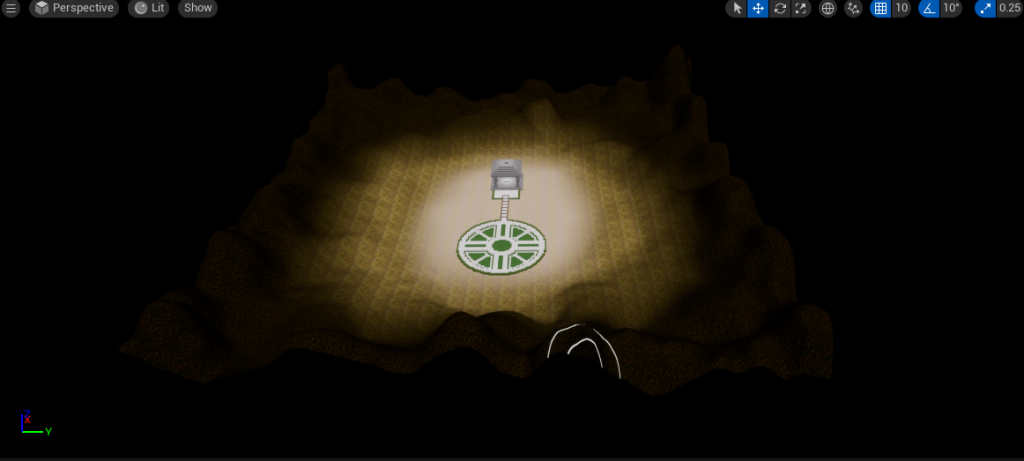
Next was to move onto foliage. But first I went back onto landscape sculpting and created a dip into the hill and painted it with the lowest layer texture to give the impression of a path leading from the back of the temple towards the horizon over the hill. I then added small trees quite heavily on either side of the temple and where I wanted the path to give the impression that this was in a thickly wooded area. I would have done them more sparcely throughout the whole landscape but when I tried that, it gave me severe lag and frame rate issues so I had to adapt and try to keep the look of deep forest whilst also maintaining a usable frame rate.
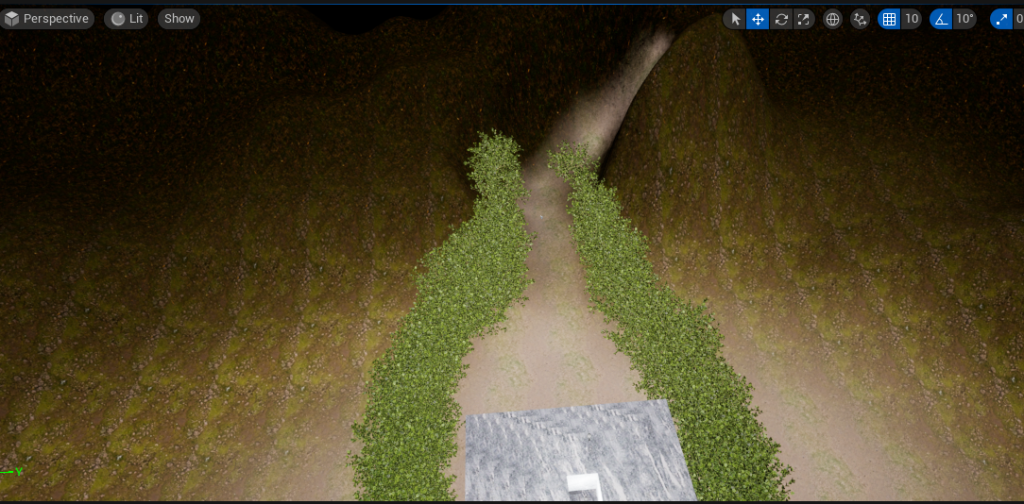
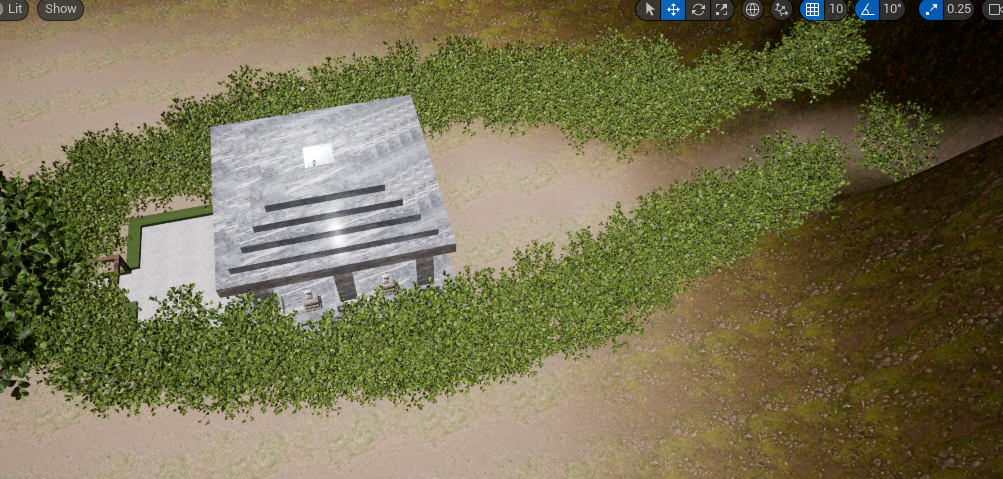
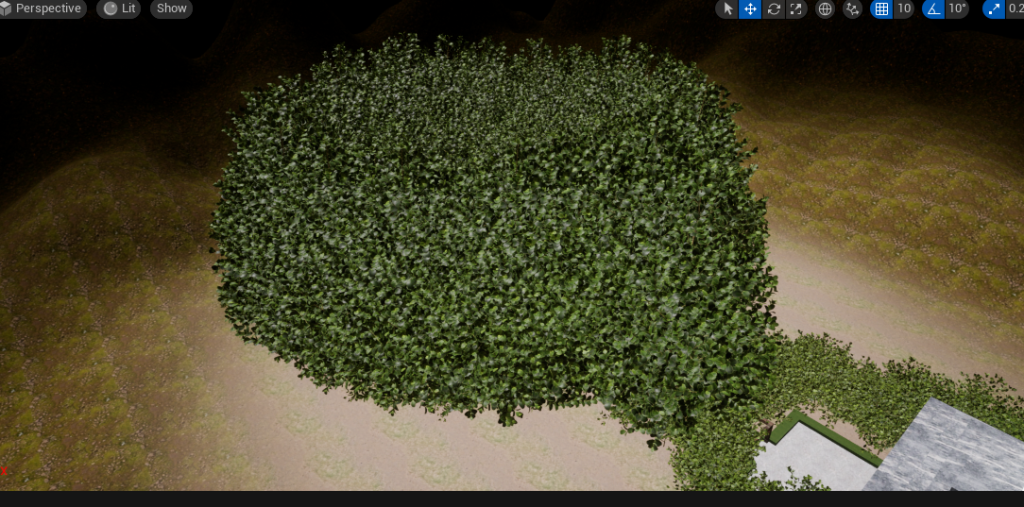
I then added a ring of much larger trees around the garden and the path as for the visuals I had in mind, the trees in this area absolutely had to completely tower over the camera. I also had to use larger trees for the path as the branches had to converge above it to create a wall the camera couldnt see through so could only view the garden by going through the tight tunnel and having the garden open up.
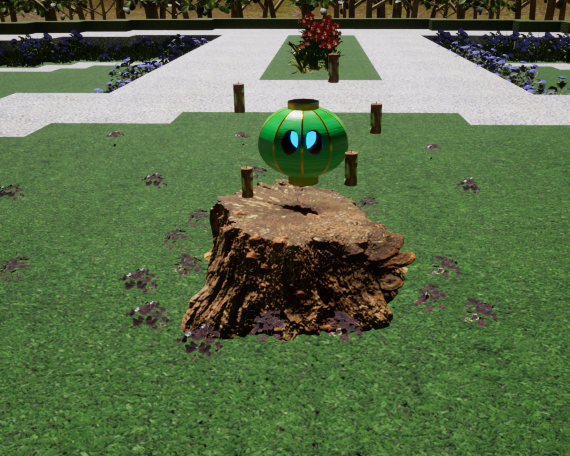
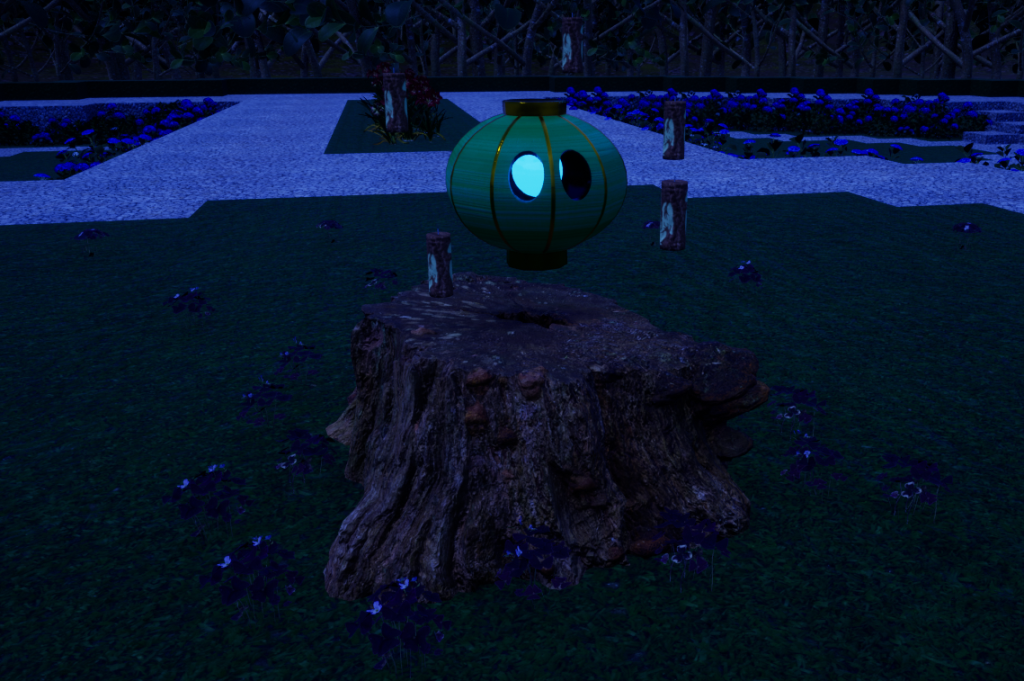
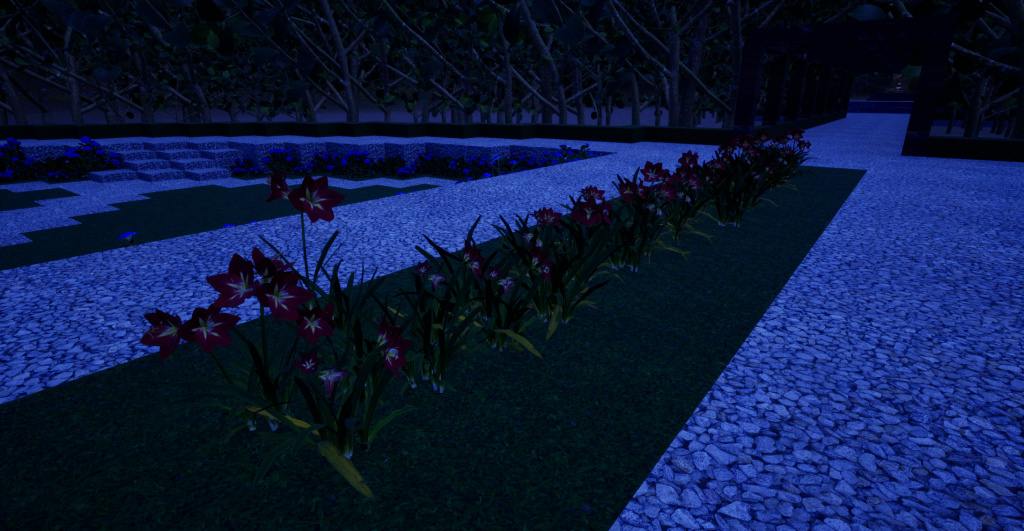
After that it was time to decorate the actual garden. I started off by taking the edges of the sunken quarters and used various bigleaf hydrangeas to give it a flowery border. I had planned on using two different colours of flower and using them in alternating quarters but I had to give up trying after the majority of the plants I tried turned out to just be 2D and not actual flower assets, so I had to use the hydrangeas in all 4 quarters. Next was the rectangular sections. I tried to give the impression of a line of grass with the amarylises giving a nice sense of colour. However, I still had to be careful about lag and with all the trees and hydrangeas, I was limited in the amount of amarylises I could feasibly fit without risking another crash or losing even more frames. Around the central island I then dotted around a small amount of purple shamrock to give it some texture for when I added the tree stump in there.
I placed a tree stump between the shamrock and imported by asset to hover above, finishing the garden.
The only thing left to sort was the sky as currently this landscape was in a void. I started by re-adding the directional light, the sky light, the sky atmosphere, and others. I used the skylight to alter the direction of the sun, experimenting on whether I wanted my environment to be in sunset or full nighttime. I then altered the colour of the skylight to give an exagerated deep blue colour of nighttime. However, this made the environment very dark so I had to counter it by increasing the directional light’s intensity enough that everything became clear again without it looking like a blue daytime.

And with that sorted the environment was truly finished.
Beauty Shots and Final Video


Final Thoughts
Overall I’m happy with how the environment went despite what went wrong and the challenges I dealt with. I feel like I still managed to create what I had envisioned to a degree that I like, with the thick wooded area working very well and the gardens, while quite sparcely populated due to big problems with the frame rate and lag the foliage caused, still look nice. The trees worked perfectly with the pergola to create just the tunnel I was hoping it to be. I’m also happy with the temple, while it wasn’t my first choice in building, I’m happy with how it turned out as I feel like it was successfully made to fit into the environment when one of my main concerns that made me drop it in the first place was its incongruence to the setting.
Whilst I do feel this went well overall, there are still several areas in which things could have been done better. More forward thinking with regards to the blockouts would have been very useful as on multiple occasions, areas had to be redone due to texturing problems, with one being so bad that my whole building idea had to change, having to resort to an idea I was significantly less fond of.
I feel like I could have dived more into lighting as well. While I do feel like the moonlight effect and the glowing eye of the forest spirit worked very well for the garden, I would, given another opportunity, add small flickering fairy light type lights to the tunnel in order to give it a more whimsical fantasy feel like the forest itself is alive.
Another thing I would like to experiment with next time is water. Even if it would just mean filling in the atrium basin in the temple, I feel like that would have been interesting and worthwhile to explore further.
The final and probably most important thing I have taken from this above all else is time management as if things are left to the last minute to execute, anything going wrong has much bigger ripples than if I had had a significant amount more time to work around and correct them.
References and Assets
References
Blue Turtle (19/04/2023) Secret Forest 🌳- Fantasy Ambience , available online: https://www.youtube.com/watch?v=Ss7MeMiHnKk&ab_channel=BlueTurtle [accessed: 11/05/23]
Glenntech (15/07/2022) Wooden Pergola Tunnel, available online: https://eu.community.samsung.com/t5/galaxy-gallery/wooden-pergola-tunnel/td-p/5705972 [accessed: 19/04/2023]
Mike Kaplan (17/12/2023) 10 Most Spectacular Ancient Roman Temples, available online: https://www.touropia.com/ancient-roman-temples/ [accessed: 20/04/2023]
The Guild of Ambience (06/04/2017) Forest Sounds | Woodland Ambience, Bird Song , available online: https://www.youtube.com/watch?v=xNN7iTA57jM&ab_channel=TheGuildofAmbience [accessed: 11/05/23]
Unknown (n.d.) Log Cabin Holidays Langholm, available online: https://www.eweswaterlogcabins.co.uk/log-cabins/ [accessed: 19/04/2023]
Unknown (22/03/2014) The Roman Domus, available online: https://pocketrome.wordpress.com/2014/03/22/the-roman-domus/ [accessed: 21/04/2023]
Assets
Foliage
Quixel Bridge (n.d.) Purple Shamrock [Foliage]
Quixel Bridge (n.d.) Bigleaf Hydrangea [Foliage]
Quixel Bridge (n.d.) Amaryllis [Foliage]
Quixel Bridge (n.d.) Boxwood [Foliage]
Quixel Bridge (n.d.) Cracked Stump [Foliage]
Asset
Quixel Bridge (n.d.) Decorative Statuette (male) [3D Asset]
Quixel Bridge (n.d.) Decorative Statuette (female) [3D Asset]
Quixel Bridge (n.d.) Female Bust Statuette [3D Asset]
Quixel Bridge (n.d.) Japanese Stone Plinth [3D Asset]
Quixel Bridge (n.d.) Small Wooden Chest [3D Asset]
Surfaces
Quixel Bridge (n.d.) Artificial Turf [Surface]
Quixel Bridge (n.d.) Bardiglio Marble [Surface]
Quixel Bridge (n.d.) Construction Gravel [Surface]
Quixel Bridge (n.d.) Forest Floor [Surface]
Quixel Bridge (n.d.) Grass [Surface]
Quixel Bridge (n.d.) Grassy Soil [Surface]
Quixel Bridge (n.d.) Mossy Rock Ground [Surface]
Quixel Bridge (n.d.) Wooden Planks [Surface]